How it works
How to Calibrate a Decibel Meter on iPhone
Calibration is the single step that decides whether a phone reading means anything. It takes about a minute, it is free in dB Decibel, and it is worth understanding rather than just tapping through.
 Guided calibration is free for everyone. Accuracy is the point of the app, so it is not behind the paywall.
First principles
Why an offset is needed at all
A microphone does not report sound pressure. It reports a level relative to digital full scale, written dBFS, which is always a negative number and means nothing on its own. Sound pressure level in dB is obtained by adding a constant:
SPL = dBFS + offset
The offset belongs to the microphone, the enclosure and the audio path. Get it wrong by 10 dB and every reading is wrong by 10 dB, in a way that looks entirely convincing. This is the whole reason two meter apps on the same phone can disagree.
Inside the app
Three offsets, added together
dB Decibel builds the total offset from three parts, so you only ever have to adjust the part that is yours.
1. Shipped
Base offset per model
A constant measured per iPhone model and built into the app, running from about 93 to 95.5 across the iPhone SE third generation and the iPhone 13 to 16 families. A model that is not in the table falls back to 95.0.
2. Yours, free
Basic offset
What the guided calibration sets. It is a simple shift: the app takes the difference between the reference level you enter and the level currently on screen, and adds it to whatever basic offset you already had.
3. Pro
Fine trim
A manual trim for matching a reference meter precisely, plus a separate per input trim so an external or Bluetooth microphone keeps its own correction. Detecting an external microphone is free, trimming it is part of Pro.
Total offset is simply base plus basic plus fine trim, with the per input trim added on top when a non built in microphone is selected. The same total is what maps the microphone noise floor into the near silence threshold, so calibrating well also makes the near silence flag land in the right place.
Step by step
The one minute version
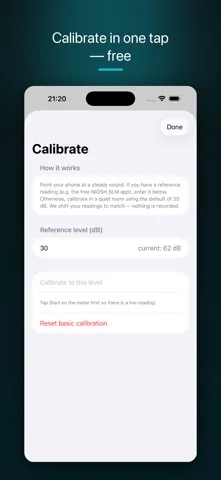
- Start the meter first. Calibration needs a live reading, and the button stays disabled until there is one.
- Open Calibrate.
- Point the phone at a steady sound. Steady is the operative word: a fan, ventilation, a running tap. Not speech, not music, nothing with transients.
- Enter your reference level in dB and tap Calibrate to this level. The app shifts all future readings by the difference.
- If you have no reference at all, calibrate in a genuinely quiet room using the default of 30 dB. Less exact, but far better than nothing.
- Reset basic calibration puts you back to the shipped offset for your model whenever you want to start over.
Nothing is recorded during calibration. It reads the live level and stores a number.
Getting a reference
Where the reference number should come from
In order of usefulness: a certified sound level meter you have access to, a hardware calibrator, or a second phone running a validated meter app.
dB Decibel's own calibration screen names the free NIOSH Sound Level Meter as the reference to use, and there is a reason for that: NIOSH tested it in their own acoustics laboratory and report it as accurate within ±2 dBAagainst a reference meter. Using somebody else's validated app as your yardstick is not a weakness, it is the correct thing to do. There is more on that comparison in dB Decibel compared with the NIOSH Sound Level Meter.
Things that ruin a calibration
- Leaving the phone in a thick case. Cases cover the microphone port or turn it into a small resonant cavity.
- A hand across the bottom edge, which is where the primary microphone is.
- Calibrating against a sound that is not steady. The app captures one moment.
- Calibrating in one environment and measuring in a wildly different one. Recalibrate when the situation changes materially.
- Calibrating while an external microphone is connected and then switching back, or the reverse. Each input needs its own trim.
The honest part
What calibration cannot fix
Calibration removes one constant error. It does nothing about the three that remain.
- The noise floor. Below roughly minus 55 dBFS the microphone measures itself. No offset recovers a room that is quieter than that, which is why dB Decibel reports near silence rather than a number.
- The ceiling. Past full scale the waveform is cut flat and the level is under reported. An offset cannot undo clipping, so the app flags it instead.
- Frequency response. A phone microphone is not flat, and it loses sensitivity at low frequencies. A single offset shifts every frequency by the same amount, so it cannot correct a tilt.
Calibrated or not, this is an uncalibrated phone microphone in the sense that matters legally. It stays approximate, and the app says so on the meter screen.
What this app is not. Readings are approximate (±dB) and come from an uncalibrated phone microphone. dB Decibel is an environmental sound measurement tool. It is not a certified sound level meter, not a dosimeter, not hearing protection and not a medical device, and it is not suitable for occupational, regulatory or legal compliance. That wording is taken from the disclaimers inside the app itself.
Get the app
Calibrate once, then trust the comparisons
Guided calibration ships in the free version along with the live meter, Leq, L10, L90 and the near silence and clipping flags. Fine trim against a reference meter, and per input trim for external and Bluetooth microphones, are part of the one time Pro unlock.
Free to download. iPhone, iOS 18 or newer. Optional one time Pro unlock, no subscription.Keep reading